Minecraft Tools
How to Make a 30 by 30 Circle in Minecraft?
A verified 30×30 outline, organized into 15 mirrored row pairs so you can build it cleanly without guessing where the curve should step.
By Vigneshwaran Vijayakumar, Developer and Publisher | | Reviewed under the ClockTools editorial policy
Table of contents
A 30×30 circle is big enough for a tower, arena rim, or broad floor—but it is also big enough for one misplaced block to hide until you reach the opposite side. Freehanding the curve usually feels fine for the first quarter. The trouble appears when the last two quarters refuse to meet.
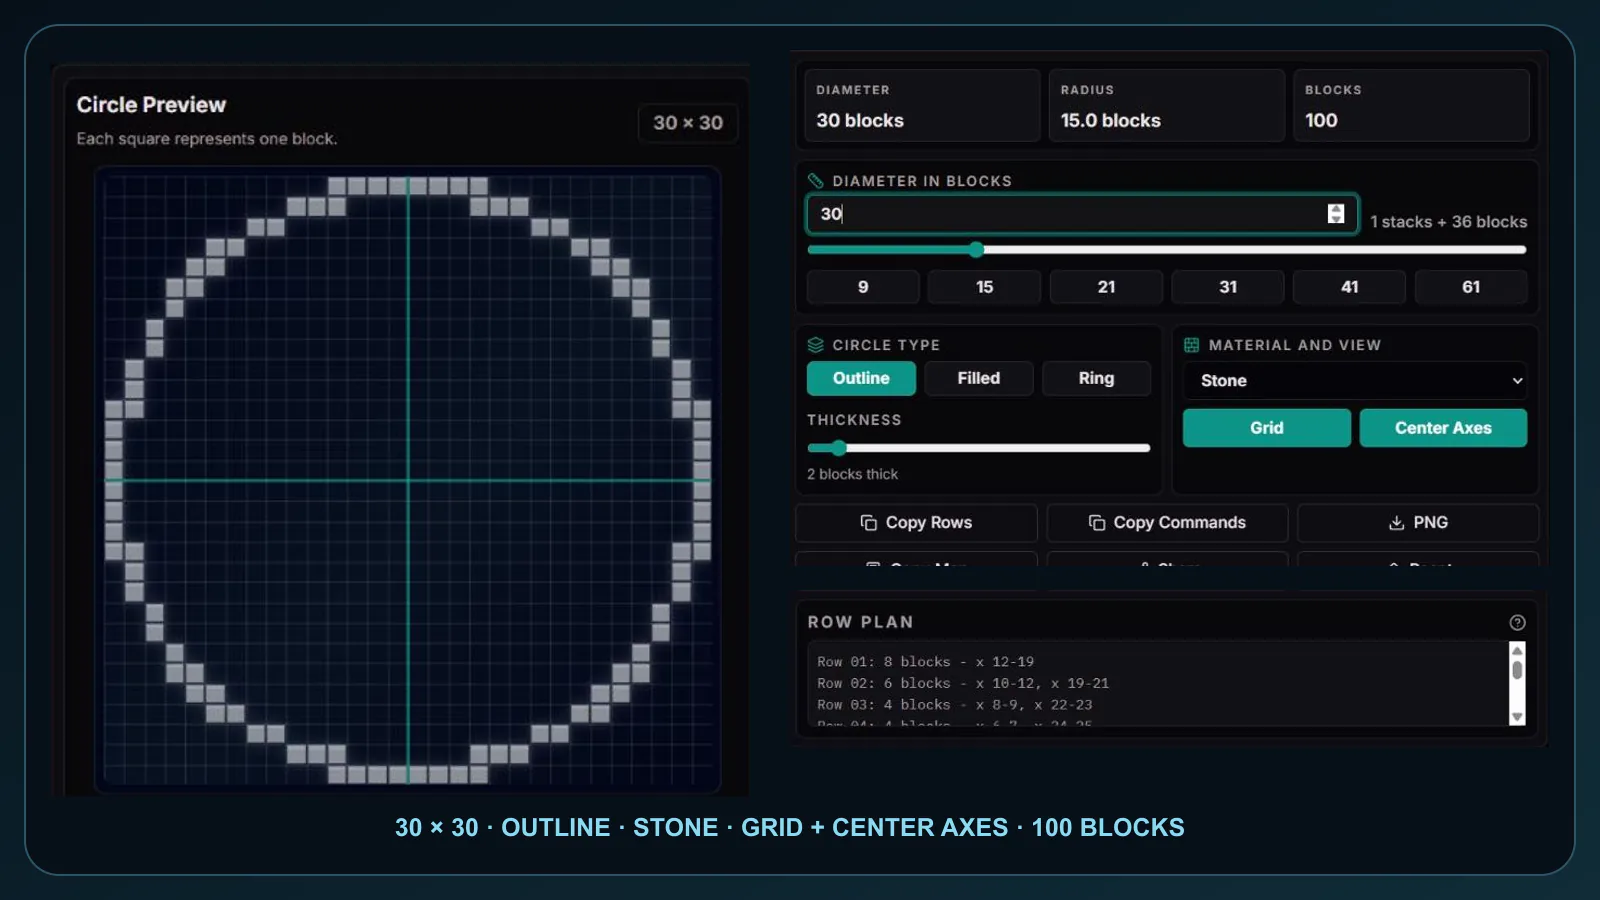
Here is the clean answer. Set the ClockTools Minecraft Circle Generator to a diameter of 30 blocks and choose Outline. The verified result uses 100 blocks, or 1 stack plus 36 blocks, and fits inside a 30-by-30 grid. Because 30 is even, the center sits between four blocks rather than on one center block.
The row plan below is taken from the live ClockTools output checked on August 26, 2026. It is not a hand-drawn guess. Build the first 15 rows, mirror them for the bottom half, and the outline will close cleanly.
What does “30 by 30” mean in a block grid?
For this build, 30×30 describes the circle’s outside width and outside height. Imagine a square grid with columns 1 through 30 and rows 1 through 30. The circle touches all four edges of that grid, but most squares remain empty because you are placing only the curved outline.
That distinction prevents two common measuring errors. Thirty is the diameter, not the radius, and it is not the number of blocks around the perimeter. The ClockTools result displays a radius of 15.0 blocks, while the completed outline contains 100 placed blocks.
Minecraft turns the curve into a staircase of short horizontal and vertical runs. That is the nature of building a rounded shape from square blocks. Even Minecraft’s official building-structure guide treats circles as useful but tricky block-built curves. A good blueprint does not make the edges smooth; it makes the stepping deliberate and symmetrical.
What pattern does ClockTools generate for a 30×30 outline?
The table condenses all 30 generated rows into 15 mirrored pairs. Positions are counted from left to right across a 30-block-wide grid. A range such as x 12–19 means place every block from column 12 through column 19, inclusive.
| Top and bottom rows | Blocks to place from the left edge | Blocks in each row |
|---|---|---|
| 1 and 30 | x 12–19 | 8 |
| 2 and 29 | x 10–12 and x 19–21 | 6 |
| 3 and 28 | x 8–9 and x 22–23 | 4 |
| 4 and 27 | x 6–7 and x 24–25 | 4 |
| 5 and 26 | x 5–6 and x 25–26 | 4 |
| 6 and 25 | x 4–5 and x 26–27 | 4 |
| 7 and 24 | x 4 and x 27 | 2 |
| 8 and 23 | x 3 and x 28 | 2 |
| 9 and 22 | x 3 and x 28 | 2 |
| 10 and 21 | x 2 and x 29 | 2 |
| 11 and 20 | x 2 and x 29 | 2 |
| 12 and 19 | x 1–2 and x 29–30 | 4 |
| 13 and 18 | x 1 and x 30 | 2 |
| 14 and 17 | x 1 and x 30 | 2 |
| 15 and 16 | x 1 and x 30 | 2 |
Each pattern is used twice: once near the top and once at its matching position near the bottom. The counts in the final column are per row, not per pair. Adding both halves gives the verified total of 100 blocks.
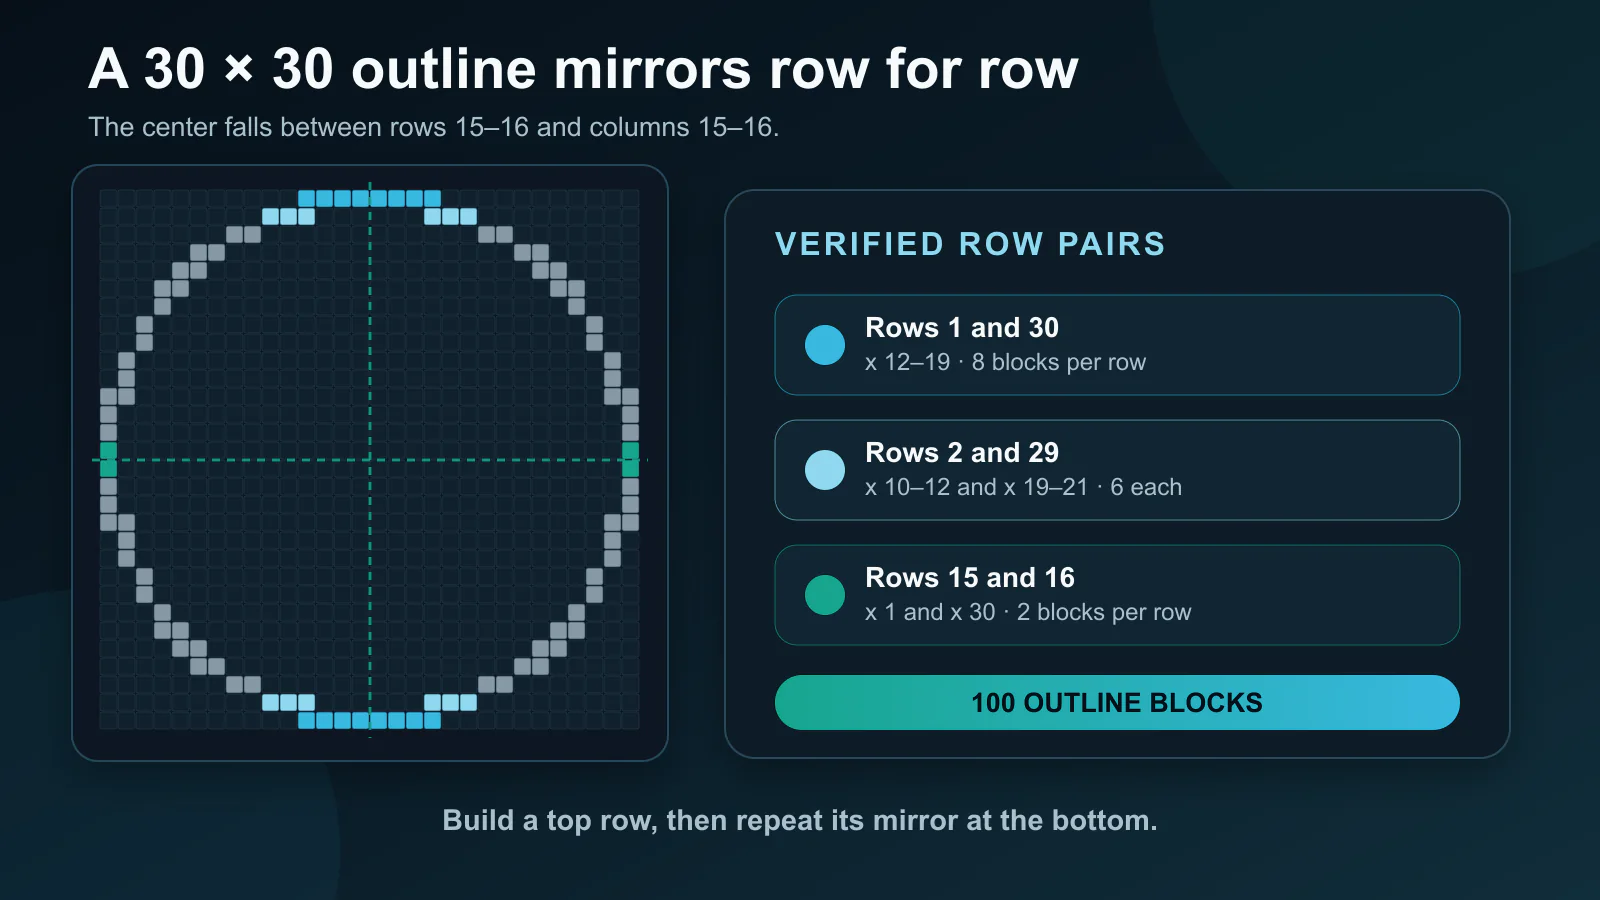
The diagram turns the same table into a quick visual check: every colored top-half row has one matching row below the center seam.
Different pixel-circle generators can choose slightly different edge blocks because a square grid cannot represent a mathematical curve exactly. This article follows the ClockTools pattern consistently. Do not splice half of this plan together with half of another chart, even if both are labelled 30×30.
How do you read the row pairs?
Start with row 1. Leave columns 1–11 empty, place eight blocks across columns 12–19, then leave columns 20–30 empty. Row 30 is identical.
Row 2 has two segments. Place three blocks at columns 10–12 and another three at columns 19–21. The blank space between the segments is the open interior of the circle. Repeat that same layout on row 29.
The single-position entries are literal. On row 7, place one block at column 4 and one at column 27. There is no hidden run between them. The outline widens as the rows approach the middle, reaches the left and right boundaries, and then mirrors back toward the bottom.
If counting columns in-game feels slow, use temporary markers every five blocks along one outside edge. Another practical option is to copy the row plan and keep it in the ClockTools online notepad on a second screen. Delete each row as you finish it; the remaining lines become a simple build checklist.
How do you build the outline without drifting out of symmetry?
The safest method is to work in pairs instead of drawing one continuous arc.
- Choose a reference corner. Mark the north-west corner of the 30×30 footprint as row 1, column 1. The compass direction is optional for a manual build, but one fixed corner keeps every count consistent.
- Mark the opposite edges. Count 30 block positions across and 30 down. Place temporary corner markers so the bounding square cannot quietly become 29×30 or 30×31.
- Find the center seam. The midpoint lies between columns 15 and 16 and between rows 15 and 16. Use temporary guide blocks inside the circle if you want a visible cross.
- Build rows 1 and 30 together. Then build rows 2 and 29, followed by rows 3 and 28. Every completed pair gives you an immediate symmetry check.
- Work toward rows 15 and 16. Those middle rows are identical: one block at x 1 and one at x 30.
- Count before removing the guides. The outline should contain 100 blocks. If it does not, compare each row with its partner before hunting around the whole perimeter.
Building opposite rows together feels less fluid than walking the curve, but it catches errors early. A misplaced block on row 5 becomes obvious when row 26 does not match. If you trace the whole circumference first, the same error may only reveal itself when the final corner misses by one.
Why does a 30×30 circle have no single center block?
Odd and even diameters center differently. A 31×31 grid has a definite middle row and middle column: row 16 and column 16. A 30×30 grid has two middle rows and two middle columns: 15 and 16 in both directions.
The geometric center is the point where the seams between those four middle blocks meet. That is why an even circle can feel “off” when you try to place one central marker. The pattern is not broken; the center simply falls between blocks.
This matters when the circle surrounds another feature. A single-block beacon, pillar, or door lines up more naturally with an odd diameter. An even diameter suits a two-block-wide entrance, a paired central aisle, or a build planned around a 2×2 center. If your design absolutely needs one center block, compare the 29×29 and 31×31 previews before gathering materials.
Should you use Outline, Ring, or Filled mode?
The row table in this article is for Outline mode only. Choose it for a tower footprint, arena boundary, pond edge, decorative ring, or any build where the interior should stay open.
Choose Ring when the wall itself needs width—for example, when players will walk along the top or when the perimeter must support rooms. Choose Filled for a floor, platform, ceiling, courtyard, or the solid layer of a larger shape. Both choices change the block positions and total, so regenerate the plan with the same diameter instead of trying to thicken this outline by eye.
Material selection does not change the geometry of the ClockTools pattern. It changes the preview and the block ID used by the copied commands. You can therefore test the shape in stone, then switch to glass, concrete, or another listed material without re-counting the rows.
Can commands place the circle for you?
ClockTools can copy a command list that represents each continuous row segment with a /fill instruction. The tool assumes a starting point near the north-west corner and uses relative coordinates, so your position and orientation deserve a careful check before you run anything.
Command support and syntax can differ by edition and version. Microsoft’s official Bedrock /fill reference says the command fills a region and requires cheats. If you are using Java Edition, a Realm, or a server with its own permissions, check the in-game help and your server rules rather than assuming the Bedrock syntax applies unchanged.
Test generated commands in a disposable area or a copy of the world first. A row plan is easy to undo by hand; a command can replace many blocks immediately. Survival builders can ignore the command output entirely and use the same verified blueprint manually.
How can the same pattern become a tower or dome?
Repeat the 30×30 outline at the same position on successive vertical layers and you have the footprint of a cylinder: useful for towers, silos, circular walls, and arena exteriors. Keep one corner and the center seam fixed on every layer. If either reference moves, the wall will lean or develop a visible notch.
A dome is different. Its horizontal circles must become smaller as the build rises. Do not stack the 30×30 outline unchanged and expect it to curve inward. The official Minecraft guide describes spheres as a sequence of increasing circles, repeated at the widest section, followed by decreasing circles. A dome uses the same broad idea but only the upper portion.
Plan those layers separately. The 30×30 pattern can be the base, but every reduced diameter deserves its own generated row plan. That takes longer at the planning stage and saves a great deal of rebuilding near the top.
What should you save before starting a survival build?
For the outline documented here, gather at least the verified 100 structural blocks. That is one full stack plus 36 blocks. Scaffolding, temporary center guides, lighting, doors, and decoration are separate materials, so the final inventory for a tower or arena will be larger.
Before leaving the generator, save three things:
- the downloaded PNG, which gives you the whole shape at a glance;
- the copied row plan, which is easier to follow one line at a time;
- the block count, so a short inventory does not stop the build halfway around.
Keep the PNG for orientation and the text plan for precision. Images are excellent for spotting the curve, while numbered rows are better for resolving a doubtful block. If the picture and your memory disagree, trust the recorded positions.
One final walk-around is worth the minute. Rows 1 and 30 should each have an eight-block run. Rows 15 and 16 should touch only columns 1 and 30. The top must mirror the bottom, the left must mirror the right, and the count must finish at 100. When those checks agree, the circle is ready to become whatever you planned above it.
Frequently Asked Questions
How many blocks are needed for a 30×30 Minecraft circle?
The ClockTools 30×30 Outline pattern uses 100 blocks, which is 1 stack plus 36 blocks. Ring and Filled modes use different layouts and totals.
Where is the center of a 30×30 Minecraft circle?
Because 30 is even, there is no single center block. The center lies at the meeting point between rows 15 and 16 and columns 15 and 16.
Is the 30×30 row plan the same in Java and Bedrock Edition?
The manual block layout uses the same 30×30 square grid in either edition. Generated command syntax and permissions can differ, so check the in-game command help for your edition and version.
Is a 30×30 Minecraft circle the same as a radius-15 circle?
Its outside diameter is 30 blocks and ClockTools displays a radius of 15.0 blocks. Since the diameter is even, the geometric center falls between four blocks.
Why can two Minecraft circle generators show different 30×30 patterns?
A mathematical curve cannot be represented exactly on a square block grid. Pixel-circle methods can make different rounding choices at the edge, so use one generator consistently for the entire build.
Can I use this 30×30 outline for a filled floor?
No. The table covers only the outline. Select Filled mode in the ClockTools generator to produce the correct interior blocks and updated material count for a floor or platform.
Can ClockTools create fill commands for the circle?
Yes. ClockTools can copy one fill command for each continuous row segment. Test commands in a safe area first, confirm your starting corner, and check permissions and syntax for your Minecraft edition.
Can a 30×30 circle be used for a tower or dome?
Yes. Repeat the same outline vertically for a cylindrical tower. For a dome, use the 30×30 circle as the base and generate progressively smaller circle plans for higher layers.

About The Author
Vigneshwaran Vijayakumar
Founder, Developer and Publisher of ClockTools | Digital Marketing Manager | India
Vigneshwaran is an engineer with decades of technical experience, including professional work as a Digital Marketing Manager in Dubai. His work connects data analysis, search engine optimization, conversion-rate optimization, content systems, visual production, and applied AI and machine learning. At ClockTools, he turns that multidisciplinary experience into focused browser utilities and practical, source-aware guides.